
Can you actually build a termite proof shed in Australia?

You can get close, but “termite proof” is really two different promises. Remove the timber and you remove the food source, which is as close to proof as materials get. Keep timber and you’re relying on a compliant termite management system under AS 3660.1 and the National Construction Code, which manages risk rather than eliminating it. For most backyards, the fastest fix is choosing a resin, steel or concrete shed, or if you’re keeping timber, sorting your inspection gap and clearances properly.
In the next hour, you can:
- Check whether there’s a clear, visible 75mm gap between the ground and any timber on your shed
- Pull mulch and firewood back at least 30 to 45cm from the shed walls
- Note whether your shed floor sits on soil, timber, or a raised base, since that decides your next move
Key Takeaways
A shed becomes genuinely termite resistant when its primary materials are non organic, and every remaining timber risk depends on a maintained inspection gap and a compliant management system.
| Point | Details |
|---|---|
| Material choice removes the food source | Resin, steel and concrete are classed as not subject to termite attack under NCC Part 3.4. |
| Keep the inspection gap visible | Maintain a clear 75mm gap between soil or mulch and any timber, per AS 3660.1. |
| Set mulch back properly | Keep organic mulch 30 to 45cm from the shed and under 75mm deep near the perimeter. |
| Inspect regularly, act fast | Check visually every 1 to 3 months and book a licensed inspection at least yearly. |
| Resin sheds skip the maintenance cycle | Keter’s resin shed range removes the organic food source, avoiding ongoing chemical timber treatments. |
Table of Contents
- Best materials for a termite resistant shed: resin, timber, metal or concrete
- Foundations, inspection gaps and clearance rules that actually matter
- Physical and chemical termite barriers: what’s actually available
- Retrofitting an existing shed: your practical action list
- Inspection schedule and the signs you shouldn’t ignore
- Why resin sheds sidestep the whole problem
- Author’s note: know where DIY ends
- A low maintenance way to sidestep the whole issue
- Where to check the official detail
- Sources
- FAQ
Best materials for a termite resistant shed: resin, timber, metal or concrete
Material choice is the single biggest lever you have, because it decides whether termites have anything to eat in the first place.
Resin (plastic) sheds are inherently non organic, so there’s nothing for termites to feed on. No timber treatments, no retreatment schedule, no chemical top ups. That’s a genuine practical win for suburban blocks where you want a shed you can set up and largely forget, and it’s why resin has become a common go to for smaller garden sheds across Australia.
Treated timber reduces risk but doesn’t remove it. Preservative treatments degrade over years, particularly where moisture gets in, and a compromised treatment layer can quietly stop working long before you notice anything wrong.
Natural timber species like cedar carry some natural resistance, but most are still classed as susceptible under AS 3660.1’s framework unless the specific species appears in the accepted list.
Metal structures aren’t a food source either, though they can bring their own headaches with condensation and occasional rodent interest. Still a solid, inert choice structurally.
Concrete and fibre cement are effectively non susceptible when detailed correctly, which is why slabs and cement sheeting show up so often in compliant builds.
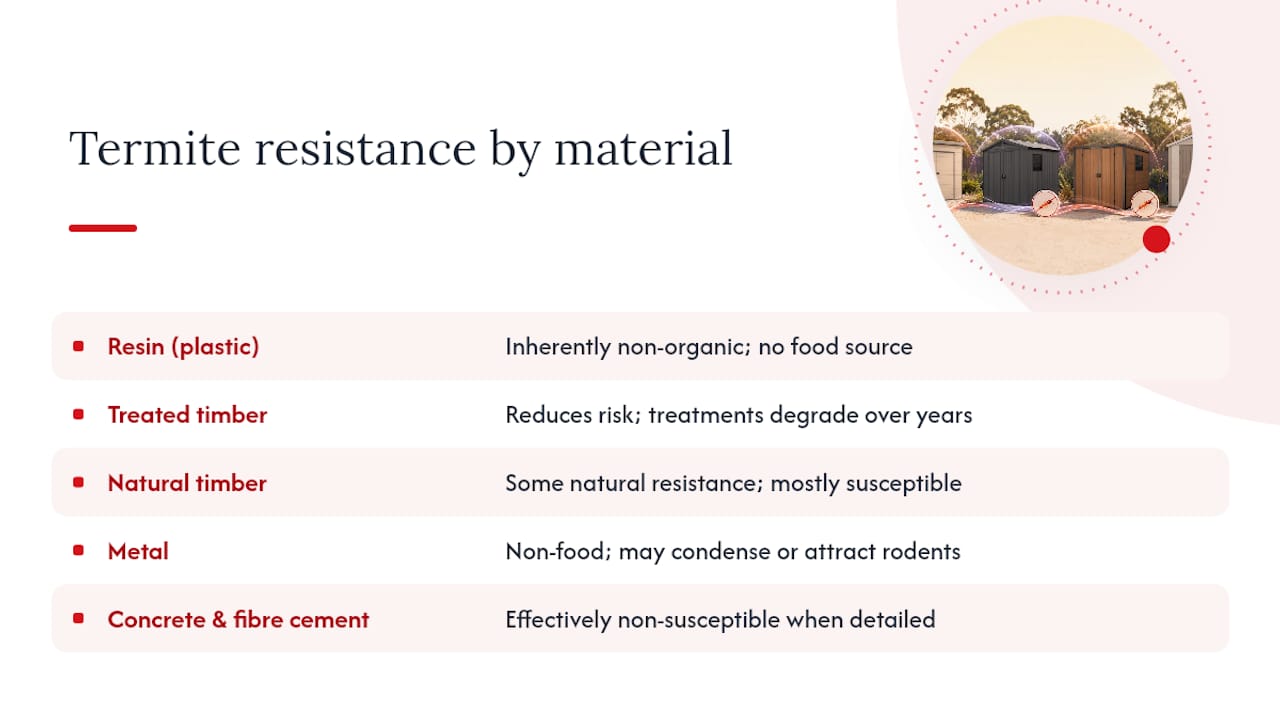
Under NCC Part 3.4, steel, concrete, masonry and fibre reinforced cement are all treated as materials not subject to termite attack. Once every primary building element is one of those, the requirement for a formal termite management system disappears. That’s the real advantage of going resin, steel or concrete: you’re not managing risk, you’re removing the obligation altogether.
Pro Tip: If you’re comparing resin against a timber kit, read through this breakdown of resin versus wood sheds before you commit, since the maintenance difference over five years is usually bigger than the upfront price gap.
Foundations, inspection gaps and clearance rules that actually matter
This is where most backyard sheds quietly fail, not because the shed itself is wrong, but because the ground around it isn’t set up for inspection.
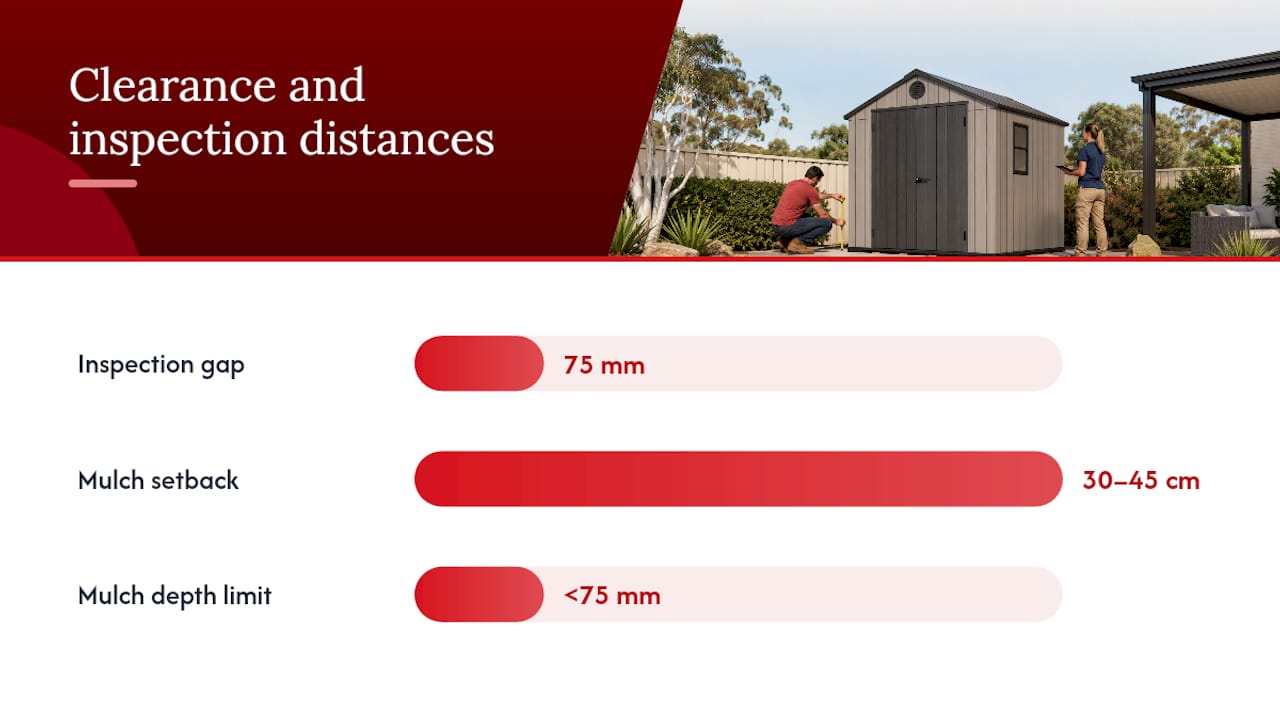
AS 3660.1 requires a visible inspection gap of at least 75mm between soil or mulch and any structural timber. That gap needs to stay clear and visible at all times, because it’s what lets you or an inspector spot mud tubes before they reach the timber. The same guidance recommends keeping organic mulch 30 to 45cm away from the structure, with mulch depth kept under 75mm anywhere closer.
Your foundation choice shapes how much of this you have to manage:
- Concrete slab on ground, poured correctly, gives you a monolithic barrier that’s hard for termites to bypass undetected.
- Raised timber on piers keeps timber off the ground and improves airflow, but only works if the inspection gap underneath stays genuinely clear, not stacked with stored gear.
- Steel frame on a compliant base sidesteps the issue almost entirely, since there’s no timber for termites to reach.
Walk your shed line now and check the ground level against the base. If mulch or garden beds have crept up over the years, that’s the first thing to fix, and swapping the immediate perimeter to pebbles or gravel keeps drainage working while leaving the inspection zone visible.
Physical and chemical termite barriers: what’s actually available
Once you’ve sorted materials and clearance, barriers cover the remaining risk, particularly for attached structures or timber elements you can’t easily replace.
Accepted systems under NCC Part 3.4 and AS 3660 include:
- Stainless steel mesh barriers, installed under slabs or around penetrations
- Graded stone barriers, sized specifically to be impassable to termites
- Chemically treated soil zones around the perimeter
- Beneath slab chemical treatments applied during construction
For a standalone garden shed, stainless steel mesh or a well laid graded stone barrier is usually the more relevant option, particularly where the shed sits close to the house and shares an inspection zone. A termite management system becomes a legal requirement the moment any primary building element is classed as susceptible, and that comes with obligations of its own: a durable, visible termite management notice, ongoing maintenance, and adherence to APVMA label lifespans for any chemical component.
Pro Tip: When you’re briefing a pest controller, ask specifically whether the proposed system is compliant with AS 3660.1 and AS 3660.3, what design life it carries, and what maintenance schedule it needs. A vague answer to any of those three questions is worth pushing back on.
Retrofitting an existing shed: your practical action list
If you’ve already got a shed and want to improve it rather than replace it, work through this roughly in order:
- Confirm your inspection gap is genuinely 75mm and visible, not obstructed by stored items or garden creep.
- Pull organic mulch and firewood back to the 30 to 45cm clearance and swap the immediate perimeter to gravel or pebbles.
- Raise or re skirt the shed if timber sits directly on soil, improving both airflow and inspectability.
- Clear any damp or shaded pockets around the base where moisture collects, since that’s what softens treated timber over time.
- Seal small gaps where timber meets soil or concrete, which is a cheap job that closes an easy entry point.
DIY covers most of that list. Where it doesn’t: installing physical stainless steel shields, concrete protection strips, or any beneath slab chemical system needs a licensed installer, both for compliance and because getting it wrong can void the protection entirely.
- Basic tools: shovel, wheelbarrow, sealant gun, gloves, safety glasses
- If chemicals are already present or being considered, step back and call a licensed pest controller rather than handling product yourself
- Photograph what you’ve done and when, since that record matters for future inspections or resale
Inspection schedule and the signs you shouldn’t ignore
Run a visual check yourself every one to three months, and book a licensed inspection at least yearly, more often in high hazard zones like North Queensland, where QBCC guidance recommends tighter standards given the elevated regional risk.
Watch for:
- Mud tubes running up piers, walls or the shed base
- Timber that sounds hollow when tapped
- Small piles of frass or timber dust near skirting or joints
- Doors or windows that suddenly stick, which can signal frame movement
If you spot any of that, stop disturbing the area, photograph it, and call a licensed pest controller rather than poking around yourself. Keep a simple log of every inspection and report, since it’s genuinely useful if you ever sell the property or need to demonstrate compliance.
Why resin sheds sidestep the whole problem
Resin isn’t organic, so it was never on the menu for termites in the first place. That single fact is why resin sheds typically skip the chemical timber treatment cycle altogether, and why Keter’s own guidance on shed kits leans on it as the core selling point over traditional timber builds.
In practice that means:
- No periodic retreatment, no chemical odour, nothing to reapply every few years
- A safer setup around kids and pets, since there’s no treated timber leaching into the yard
- Long service life in humid climates when the resin is UV stabilised and properly detailed
Pro Tip: If you’re set on keeping a timber look, some resin shed ranges use wood effect panelling, so you don’t have to trade aesthetics for the maintenance win.
Author’s note: know where DIY ends
Do the landscaping and inspection work yourself. It’s genuinely simple and it’s what most sheds are missing. But beneath slab chemical systems and formally tested physical barriers need a licensed installer, full stop. Document everything you do either way, because the next inspector will thank you for it.
A low maintenance way to sidestep the whole issue
If you’ve read this far, you already know the honest shortcut: choose a material termites can’t eat. That’s exactly the gap Ketergroup’s resin range is built to fill, giving you a shed you install once and don’t have to keep treating, checking treatment layers on, or worrying about come inspection time.

For most suburban blocks, the Keter Manor 4 x 6 Garden Shed suits a compact yard where space is tight but you still want proper lockable storage. If you need more room for tools, mowers and outdoor gear, the Keter Cortina Garden Shed 9x7 or the larger Keter Cortina Garden Shed 11x7 both give you that extra footprint without introducing a single piece of susceptible timber. Pair either with a Curver Style Storage Box Set inside to keep smaller items off the shed floor and away from any residual ground moisture.
Have a browse through the current shed range on ketergroup.com.au and compare dimensions against your available space. It only takes a few minutes, and it’s the one decision in this whole article that removes the problem rather than managing it.
Where to check the official detail
- NCC Part 3.4: defines non susceptible materials and system requirements.
- QBCC termite guidance: regional risk advice and notice obligations.
- AS 3660.1 inspection zone guidance: inspection gap and mulch clearance figures.
- Mulch and the 75mm rule: practical landscaping fixes from a licensed operator.
Sources
- Part 3.4 Termite risk management | NCC
- AS 3660.1 inspection zone guidance (Queensland housing newsflash)
- Protect against termites | Queensland Building and Construction Commission
FAQ
What is the best termite resistant wood in Australia?
Some naturally durable species show partial resistance, but most timber, including popular garden shed species, is still classed as susceptible under AS 3660.1 unless it appears on the accepted species list. Non organic materials like resin, steel or concrete are the more reliable choice if you want to avoid the issue entirely.
What is a termite’s worst enemy?
Practically speaking, it’s a clear, dry, visible inspection gap. Termites rely on hidden, moist pathways to reach timber undetected, and removing mulch, firewood and ground cover near a structure exposes any activity long before it causes real damage.
Which mulch is termite resistant?
No organic mulch is truly termite resistant, since all organic material can shelter termite activity if piled against a structure. Inorganic options like pebbles or gravel near the shed perimeter are the safer choice, with organic mulch kept 30 to 45cm back.
What is the most effective termite barrier?
There’s no single “most effective” system, since the right barrier depends on the structure and site. Stainless steel mesh, graded stone, and beneath slab chemical treatments are all accepted under NCC and AS 3660 standards, and a licensed pest controller can advise which suits your shed and its foundation.
Do resin sheds need any termite treatment?
No. Resin is non organic, so it isn’t a termite food source, and Keter’s resin shed range is built specifically to skip the chemical timber treatment cycle that timber sheds require.
Recommended
- Shed moisture barrier: your complete Australian guide – Keter Australia
- Shed security ideas for homeowners: practical fixes – Keter Australia
- Garden shed sizes in Australia: your complete buying guide – Keter Australia
- From Box to Backyard: A Step-By-Step Guide to Assembling Your Keter Shed Kit | Keter Australia


