
Modular tool storage ideas for quick access and easy transport

The best modular tool storage setups combine three approaches: stacking systems for expandable capacity, drawer chests or rolling trolleys for repeat tasks, and hybrid wall-plus-mobile arrangements that split the difference. Which one wins depends on how far your tools need to travel and what the weather’s doing when they get there.
If you’re mostly working from a fixed garage or shed, a drawer chest with good caster wheels will beat you to the right spanner every time. If you’re jumping between job sites, a stacking system with a rolling base and weather-resistant seals does more heavy lifting, literally and otherwise. Tradespeople who split their week between the workshop and the ute tray usually land on a hybrid: a few modules clipped to a wall plate at home, with a lighter stack that unclips and rolls straight into transport.
Three deciding factors matter more than brand loyalty or colour scheme:
- Transport — does it roll, does it have a rigid handle, and can one person lift a full stack into a vehicle?
- Expandability — can you add a drawer or organiser next year without replacing what you already own?
- Weather resistance — will dust or rain get into the case, and does that matter for what you’re storing?
Pro Tip: Before buying anything, work out your actual travel radius. A tradie driving to three sites a day needs different gear than a weekend DIYer who never leaves the garage. Buy for the trip you take most often, not the one you take twice a year.
If you want a system that’s already built to handle both ends of that spectrum, Keter’s modular tool storage range is worth a look before you commit to any single format.
Key Takeaways
The most reliable modular tool storage setup matches format to workflow: stacking systems for expandable, mobile kits, drawer chests for fixed-location speed, and hybrids for anyone splitting time between both.
| Point | Details |
|---|---|
| Pick by workflow, not brand | Choose stacking for portability, drawers for repeat tasks, and hybrids if you split time between site and workshop. |
| Prioritise IP rating outdoors | Look for IP65 sealing if tools travel in a vehicle or sit on exposed jobsites regularly. |
| Wheels and handles decide usability | Larger sealed castors and rigid telescopic handles prevent the most common failure points in transport. |
| Plan your ecosystem before buying | Check accessory range and interlock compatibility upfront, since most brands don’t cross-stack. |
| Start small with Keter | Begin with a Keter rolling base or drawer chest, then expand the stack as your toolset grows. |
Table of Contents
- Modular tool storage ideas at a glance
- How do stacking toolbox systems actually work?
- Why drawer chests and rolling trolleys suit repeat tasks
- Are plastic tool totes and bags worth it?
- What makes a site or cargo box weather resistant?
- When does wall-mounted storage beat a stacking system?
- How do you organise inside each module?
- Cheap modular tool storage hacks worth trying
- Materials and weather resistance: what actually matters
- How to choose a modular tool storage system
- Which Keter modular system suits your workflow?
- Caring for your modular storage system
- Building a hybrid garage-to-site system: a real workflow
- Get your modular system started with Keter
- Sources
- FAQ
Modular tool storage ideas at a glance
Here’s a compact rundown of the main formats worth considering, what they suit, and where they fall short.
- Stacking toolbox systems — interlocking cases that click together and grow as your tool collection does. Best for tradies who need a mobile, expandable rig. Budget to mid-range. Limitation: you’re locked into one brand’s ecosystem.
- Drawer chests and rolling trolleys — multi-drawer units on castors, built for repeat access in a fixed or semi-fixed spot. Best for home workshops and garages. Mid to premium budget. Limitation: heavier and less nimble over rough ground.
- Plastic totes and tool bags — lightweight, no-frills carriers for a smaller kit. Best for short trips or a limited toolset. Budget-friendly. Limitation: minimal weather protection and no internal structure.
- Site and cargo boxes — rugged, sealed cases built to survive vehicle transport and outdoor exposure. Best for jobsite and vehicle storage. Mid to premium. Limitation: bulkier and less suited to daily desktop-style access.
- Wall-mounted panels and slatwall — pegboard or slat systems that keep frequently used tools visible and within arm’s reach. Best for static workshops with wall space to spare. Budget to mid-range. Limitation: doesn’t travel with you.
- Hybrid wall-and-mobile setups — a combination that anchors some modules to the wall and keeps others mobile. Best for anyone who works from both a shed and a vehicle. Mid-range. Limitation: takes more planning upfront.
If you only try two things this month, start with a stacking system for anything that needs to leave the property, and a drawer chest for anything that stays put. That split covers most workflows without overcomplicating the shed.
How do stacking toolbox systems actually work?
Stacking systems rely on an interlock mechanism, usually a set of moulded cleats or latches on the base of one case that click into the lid of the one below. Once locked, the whole stack can be lifted, wheeled or carried as a single unit. Almost every manufacturer designs this mechanism to be proprietary, which means a case from one brand generally won’t lock onto a case from another. That’s the trade-off you’re accepting the moment you buy your first module: you’re choosing an ecosystem, not just a box.
Transport and ergonomics separate the good systems from the mediocre ones. Wheel diameter matters more than most buyers expect. Smaller castors clog with debris and struggle on gravel or uneven concrete, while larger, sealed wheels roll through worksite conditions with far less resistance. A telescopic handle that locks rigidly (rather than wobbling under load) makes the difference between a stack you can steer with one hand and one that tips the moment it hits a kerb.
Stack weight limits are worth checking before you load up, since most modular systems rate their maximum stacked weight and their per-module capacity separately.
The upside of going modular this way is real: you can start with a rolling base and one case, then add a drawer module or small-parts organiser later without replacing anything you already own. That’s the appeal behind most modular storage solutions on the market. The downside is just as real. Brand lock-in means your accessory choices are capped by whatever range the manufacturer sells, stacks get heavy fast once you’ve added three or four tiers, and premium ecosystems cost more over time than a single large toolbox.
Pick a stacking system when you need to add capacity gradually and you’re moving between locations. Pick a drawer trolley instead when your tools live in one place and speed of access matters more than portability.
Pro Tip: Test the latch mechanism in the shop before buying, not after. A latch that needs two hands to release is fine at home but genuinely annoying on a ladder or roof.
Why drawer chests and rolling trolleys suit repeat tasks
Drawers train your hands. Open the third drawer down, second slot from the left, and your 10mm socket is there, every time, without looking. That kind of muscle memory doesn’t develop with single-bin toolboxes, where every tool sits in a jumble and every job starts with a dig. Testing of tool storage systems consistently flags this as one of the biggest differences in real-world speed between drawer-based and bin-based storage.
Three things separate a good drawer chest from a mediocre one:
- Drawer depth and count — shallow drawers suit hand tools and fasteners; deeper drawers handle power tool bases and larger kits. A mix of both beats a chest full of identical drawers.
- Load rating and caster quality — a fully loaded chest can weigh well over what four cheap wheels are designed to carry, so check the stated load capacity, not just the drawer count.
- Locking features — a central locking bar that secures every drawer at once is worth paying for if the chest travels in a vehicle or sits in a shared workshop.
Workflows that lean on repeat access, engine bay work, electrical fit-outs, cabinetry, benefit most from a dedicated drawer trolley parked in one spot. When the job moves outdoors or off-site regularly, though, a pure drawer chest becomes a liability: castors weren’t built for gravel, and most chests aren’t sealed against dust. That’s where a hybrid setup, a compact drawer module that clips onto a stacking base, earns its keep. You get the muscle-memory benefit of drawers with enough portability to load into a ute when the job calls for it.
Are plastic tool totes and bags worth it?
For short trips and lighter toolsets, yes, and often they’re the smarter buy over a heavier modular system you’ll rarely fill. A tote or a well-made tool bag makes sense when you’re carrying a dozen hand tools to a single job, not moving an entire workshop’s worth of gear across town.
The appeal is weight. A plastic tote weighs a fraction of a sealed modular case, and an open-top design means you can see everything at a glance instead of unlatching a lid. The trade-off is structure: most totes have no drawers, no dividers, and nothing stopping tools from sliding around during transport.
A few upgrades close that gap without much cost:
- Clear-lid organisers clipped inside a tote keep screws, drill bits and small fasteners separated and visible.
- Foam inserts cut to shape stop precision tools from rattling against each other.
- Small-parts trays that sit across the top of a bag turn dead space into usable storage.
Durability is the real compromise. A thin-walled plastic tote won’t survive being dropped from a ute tray the way a rotomoulded case will, and most tool bags offer no protection against rain at all. If you’re reinforcing a budget tote for regular use, look for one with a rigid internal frame or add a plywood base insert, both cheap fixes that meaningfully extend the life of an otherwise flimsy carrier.
Pro Tip: Keep one lightweight tote packed permanently with your most-used dozen tools. It saves you from hauling a full modular stack for a five-minute job.
What makes a site or cargo box weather resistant?
The single most useful spec here is the IP rating, and it’s worth understanding before you buy anything that lives in a vehicle or on an exposed site. IP65 means a case is dust-tight and can resist low-pressure water jets from any direction, which covers most Australian conditions from coastal salt spray to a dusty outback job site. Anything rated below that, IP54 for instance, will keep out incidental splashes but isn’t built for sustained exposure or driving rain.
Materials matter as much as the seal rating. Look for reinforced lids, rubber gaskets around the lid perimeter, and structural resin or plastic at the corners, where most impact damage occurs. A case with a good seal but a brittle latch will still let dust in once the latch cracks from repeated slamming shut in a ute tray.
| Use case | Priority feature | Typical exposure | Recommended protection |
|---|---|---|---|
| Long-haul trades (electricians, plumbers) | Vibration resistance, secure latches | Constant vehicle transport | Reinforced corners, sealed latches |
| Roofing crews | Impact resistance, UV stability | Direct sun, occasional drops | Structural resin body, gasket seal |
| Landscaping and outdoor crews | Dust and moisture sealing | Soil, dust, rain | IP65-rated seal, drainage-friendly base |
A box rated IP65 or higher will keep dust and jetted water out from any direction, a genuinely useful spec for coastal properties where salt-laden air corrodes unprotected metal fasteners within a season or two.
Pro Tip: If you’re storing gear in the tray of a ute, tie the stack down even if it’s inside a cargo box. Sudden braking shifts weight fast, and a sliding case can crack a latch you were relying on to keep the weather out.
When does wall-mounted storage beat a stacking system?
Wall storage wins on visibility. A slatwall panel or pegboard puts every frequently used tool in sight and within arm’s reach, no lid to open, no drawer to search. Comparisons between stackable and wall-mounted storage generally agree that stackable systems maximise portability and vertical footprint, while wall systems maximise reach speed and free up floor space entirely, a genuine advantage in a single-car garage doubling as a workshop.
The smartest workshops don’t pick one over the other. A hybrid setup anchors a few high-use modules to the wall, drill drivers, measuring tools, safety gear, while keeping the bulk of the kit mobile in a stacking system nearby. Some stacking ranges support this directly: a base module clips onto a wall-mounted plate at home, then unclips in seconds when it’s time to load the vehicle.
Before drilling anything into a garage or shed wall, check the load-bearing capacity of the studs or masonry behind it. A fully loaded slatwall panel carrying several kilograms of tools needs solid anchor points, not just plasterboard screws. If you’re renting or unsure of the wall structure, a freestanding pegboard frame gives you the same visibility without the structural risk.
- Map out your five most-used tools and mount those on the wall first.
- Keep bulky or rarely used gear in the mobile stack, not on the wall.
- Reassess every few months. What you reach for daily changes as jobs change.
How do you organise inside each module?
A module without internal structure is just a bigger junk drawer. The fix is tiered organisation: dedicated small-parts organisers for screws and fittings, removable bins for mid-sized items, and one deep crate for bulky or awkward-shaped tools that don’t fit anywhere else.
For high-value precision tools, calipers, multimeters, fine chisels, foam inserts earn their cost back quickly. Cut a shape (“shadow boxing”) that matches the tool exactly, and two things happen: the tool stops rattling around during transport, and the empty foam cutout becomes an instant visual checklist. If a shape is empty, you know immediately something didn’t make it back into the case.
- Sort tools into three tiers: daily-use small parts, mid-frequency hand tools, and bulky or occasional-use gear.
- Assign each tier its own bin, drawer or organiser rather than mixing them.
- Add labels to every drawer front, even something as simple as a strip of masking tape and a marker cuts search time dramatically.
- Use transparent lids wherever possible so you can identify contents without opening anything.
Testing of modular organisers backs this up directly: transparent-lid organisers and foam inserts reduce the amount of time spent digging through a case, which adds up over dozens of jobs a week for a working tradesperson.
Pro Tip: Label drawers by task, not just by tool type. “Electrical rough-in” tells you more at a glance than “wire strippers and pliers.”
Experienced tradies typically run at least two dedicated small-parts organisers and one deep crate alongside a rolling base, medium module and large stack, enough tiering to avoid digging without turning the setup into a maze.
Cheap modular tool storage hacks worth trying
Modular behaviour doesn’t require a full branded ecosystem straight away. A stack of milk crates, screwed or zip-tied together, gives you the same stackable logic as a commercial system for a fraction of the outlay. Old pallets, disassembled and rebuilt into a wall-mounted grid with small bins clipped on, do the same job as a slatwall panel.
For internal organisation, craft foam or closed-cell foam from a hardware store can be cut into rough shadow shapes for precision tools, not as tidy as a factory insert, but functionally similar. If you’ve got access to a 3D printer, custom dividers for small fasteners or drill bits cost almost nothing to produce once you’ve got a design.
| Hack | Approximate cost | Best for | Trade-off |
|---|---|---|---|
| Stacked milk crates | Low | Light tools, garage storage | No weather sealing |
| Pallet wall grid | Low | Wall-mounted visible storage | Labour-intensive to build |
| Craft foam inserts | Low | Precision tool protection | Less durable than commercial foam |
| Second-hand modular cases | Low to mid | Starting a modular ecosystem cheaply | Check latches and seals before buying |
Buying second-hand modular cases is a genuinely smart way to start an ecosystem cheaply, provided you inspect the latch mechanism and seal condition before handing over any money. A cracked latch or perished gasket is expensive to replace individually and sometimes not available at all for older or discontinued ranges. If a second-hand case has a broken interlock, it’s usually cheaper to walk away than repair it, since a system that won’t stack safely isn’t saving you anything.
Materials and weather resistance: what actually matters
Recycled structural resin and plastic dominate the modular storage market for good reason. Compared with steel, resin cases are lighter to carry, immune to rust, and generally more impact tolerant on cold mornings when steel becomes brittle and resin stays flexible. Steel still wins on raw crush resistance and is harder to puncture with a dropped tool, but it adds weight and needs ongoing rust protection, especially in coastal areas.
IP ratings are the quickest way to compare weather resistance between products. IP54 means protection against dust and splashing water, fine for a garage or shed. IP65 means dust-tight construction plus resistance to low-pressure water jets from any direction, the standard worth chasing if your gear travels in an open ute tray or sits on an exposed site regularly.
For coastal, dusty or high-vibration environments, prioritise:
- Gasket seals around every lid and drawer, not just the main case.
- Reinforced corners, where drops and vehicle knocks concentrate impact.
- Wheel quality, since cheap plastic castors degrade fastest in sandy or gravelly conditions.
Salt air corrodes exposed metal fasteners and hinges within months on an unprotected coastal property, which is one reason resin-bodied systems with stainless or coated hardware have become the standard choice for outdoor storage in Australia.
Pro Tip: If you’re near the coast, rinse cases with fresh water every few weeks even if they look clean. Salt residue builds up invisibly and accelerates wear on seals and latches.
How to choose a modular tool storage system
Work through this checklist before you commit to any single brand’s ecosystem, because switching later usually means starting from scratch.
- Define your primary use case. Jobsite transport, static workshop storage, or a genuine mix of both changes every other decision on this list.
- Estimate load per tier. A stack that looks fine empty can become unstable once every module is loaded with tools.
- Check wheel and handle ergonomics in person if you can. Small, unsealed wheels and flimsy telescopic handles are the most common failure points reported in hands-on testing of stacking systems.
- Confirm the IP rating if any part of your workflow involves outdoor or vehicle storage.
- Review the accessory range before buying your first module. Choosing a modular toolbox well means checking interlocking security and ecosystem compatibility upfront, not after you’ve already invested in one brand.
| Factor | Jobsite priority | Garage priority | Compact storage priority |
|---|---|---|---|
| Portability | Essential (wheels, handle) | Moderate | High (lightweight) |
| Weather resistance | Essential (IP65 target) | Low | Low to moderate |
| Capacity / drawer count | Moderate | High | Low |
| Stackability | High | High | Moderate |
| Materials | Reinforced resin, sealed gaskets | Resin or steel, either works | Lightweight resin |
| Typical budget | Mid to premium | Budget to mid | Budget |
Before handing over money, ask the seller (or check the product page) three things: what modules are currently available in the range, whether the latch or interlock mechanism is replaceable if it wears out, and what the stated IP rating actually covers.
Red flags worth walking away from: non-replaceable latches that can’t be sourced separately, wheels smaller than roughly 100mm in diameter, a manufacturer with no visible accessory range beyond the base case, and any product marketed for outdoor use with no stated weather sealing at all.
Which Keter modular system suits your workflow?
Ketergroup builds its modular tool storage range around the same priorities this checklist covers: durable recycled resin construction, weather-resistant sealing, and genuine stackability across the range rather than a single standalone case.
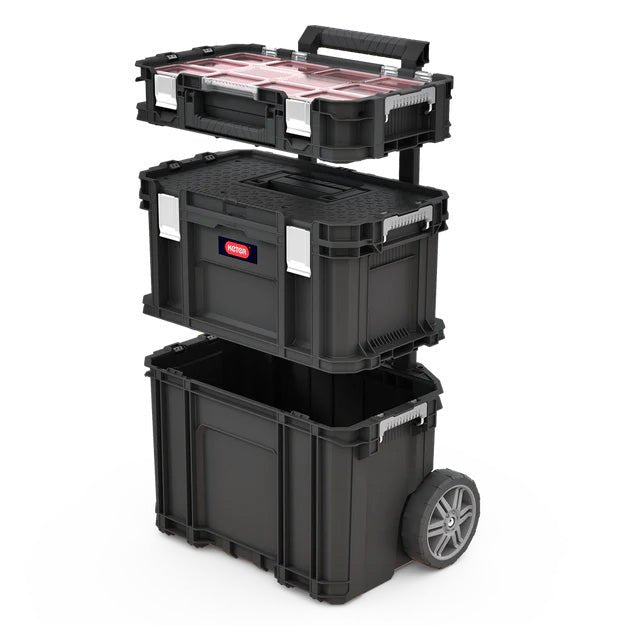
- Keter Connect Rolling Tool Storage System suits tradies who need a mobile base they can build on. It’s designed as a rolling foundation module, ideal if your work moves between the workshop and the job site regularly.
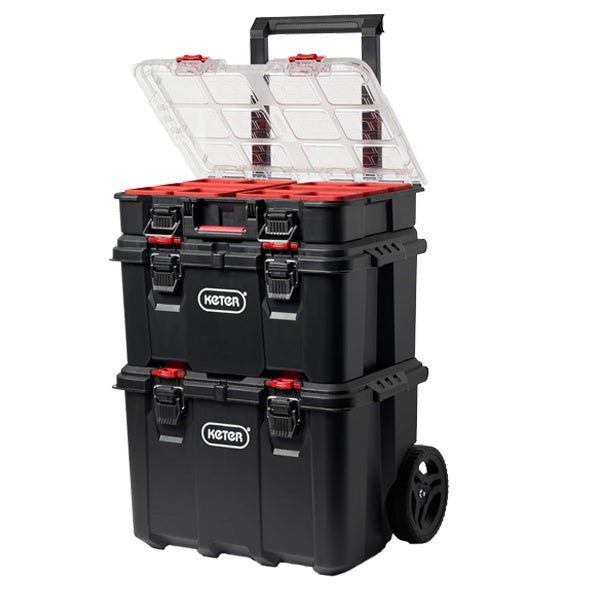
- Keter STACK N’ ROLL System is the pick for anyone planning to expand gradually. It’s built to stack, so you can start small and add capacity as your toolset grows, without replacing what you’ve already bought.
- Keter 3 Drawers Tool Chest fits the fixed-workshop workflow, drawer-based access for anyone who wants speed and muscle memory over portability, with enough drawer capacity for a well-stocked home garage.
Each of these matches a different line on the checklist above: the rolling system for transport and ergonomics, the stacking system for expandability, and the drawer chest for repeat-task speed in a static setup.
Pro Tip: If you’re building a hybrid workshop-to-site setup, start with one rolling base module and one drawer chest at home. Add stacking modules as your kit grows, rather than buying the full range upfront.
| Product | Best for | Key strength |
|---|---|---|
| Keter Connect Rolling Tool Storage System | Jobsite transport | Mobile rolling base |
| Keter STACK N’ ROLL System | Expandable garage setups | Stackable ecosystem |
| Keter 3 Drawers Tool Chest | Fixed workshop workflows | Fast repeat access |
Caring for your modular storage system
A quick daily habit protects your investment far more than any single product feature. Check latches for cracking before loading a stack into a vehicle, wipe gaskets clean of grit before closing lids, and give wheels a once-over for debris jammed in the axle housing.
For vehicle transport, stack no higher than the manufacturer’s rated limit and always tie the stack down, even inside a cargo box. Loose stacks shift under braking, and repeated shifting is what eventually cracks a latch that was otherwise fine. Foam inserts and drawer dividers also help here, since they stop small parts migrating to one end of a drawer every time the vehicle turns a corner.
- Inspect gaskets and latches monthly, more often if the case travels daily.
- Rinse dust and debris from wheel housings before it packs in and seizes the axle.
- Store cases out of direct sun when not in use. UV exposure degrades resin over years, even weather-resistant grades.
Pro Tip: In coastal or dusty regions, do a seasonal deep clean, wheels off, gaskets wiped, latches lubricated with a dry lubricant rather than oil, which attracts more dust.
Building a hybrid garage-to-site system: a real workflow
Setting up a hybrid system starts with an honest look at how often tools actually leave the property. For most trades and serious DIYers, it’s not every tool, every day, it’s a core kit that travels constantly and a larger collection that mostly stays put.
The practical approach: mount a wall plate near the workbench and clip a small module of daily essentials to it, tape measure, driver bits, safety glasses, so they’re always visible and in reach without opening a case. Everything else lives in a stacking system nearby, built up gradually with a rolling base, a mid-size module and one deep crate for bulky items. When a job comes up, the wall-mounted module either stays put or clips straight onto the mobile stack, and the whole thing rolls out to the vehicle in one trip.
The trade-off worth expecting: a hybrid setup takes more planning upfront than just buying one big toolbox. You’ll spend time working out which tools genuinely need daily access versus which ones only come out for specific jobs, and that sorting process is where most of the long-term efficiency actually comes from. Comparisons between mobile and fixed storage back this up: mobile setups save walking time on active jobs, while fixed storage builds faster selection speed in a permanent workshop. A hybrid setup is really an attempt to get both benefits without paying the full cost of either limitation.
A useful image to picture here: a garage wall with two or three modules clipped to a mounted plate above a workbench, and a taller rolling stack parked beside it, ready to unclip and load straight into a ute tray.
The result, once it’s set up properly, is fewer duplicate tools (nothing bought twice because you couldn’t find the first one) and a faster start to every job, since the gear that matters most is already sorted before you even open the vehicle.
Get your modular system started with Keter
Every idea in this guide, stacking for expandability, drawers for speed, weather sealing for anything that leaves the shed, is easier to put into practice with a system built for it from the start, rather than one you’re retrofitting after the fact.
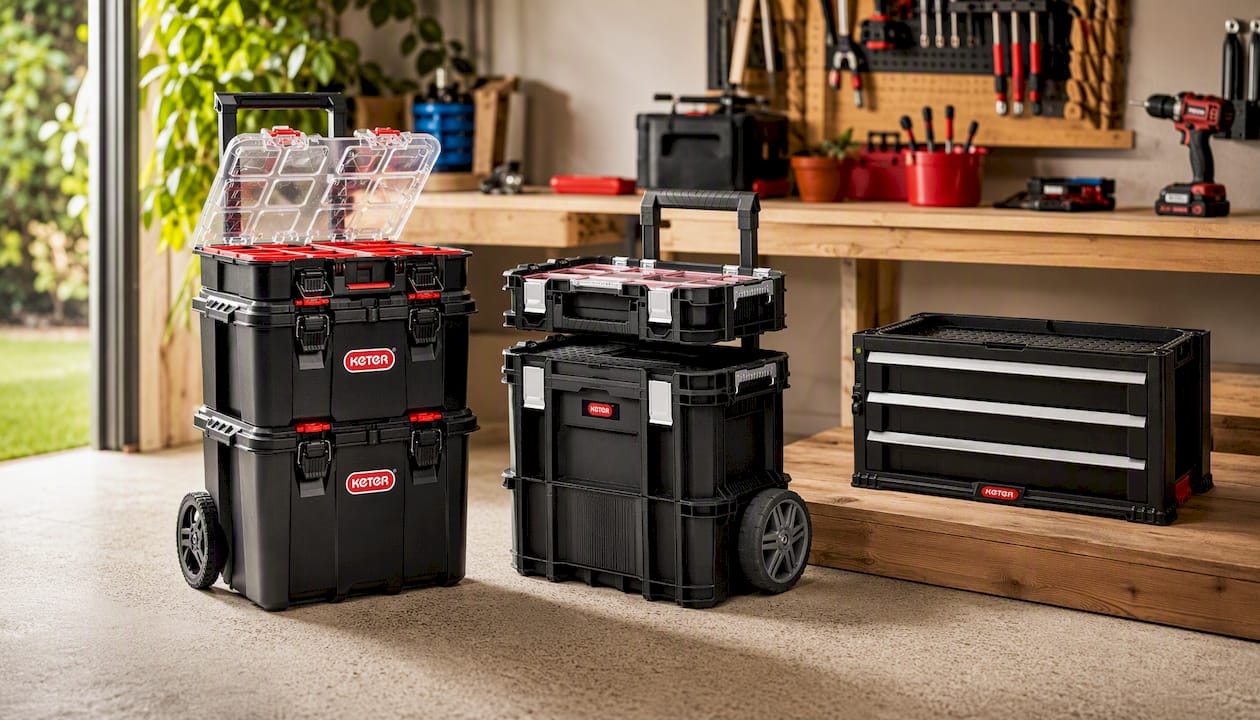
Ketergroup’s modular range covers each priority this guide has walked through: resin construction that resists rust and coastal corrosion, weather-resistant sealing designed for Australian conditions, and a genuine stacking ecosystem so you’re never boxed into buying a whole new setup just to add one more drawer. The Keter Connect Rolling Tool Storage System gives you a mobile foundation to build on, the Keter STACK N’ ROLL System lets you expand at your own pace, and the Keter 3 Drawers Tool Chest handles the fixed-workshop side of a hybrid setup.
Before you buy, check each product page for current module compatibility and available accessories, so your first purchase sets up the next one properly. Head to the Keter Connect Rolling Tool Storage System page to see whether it fits your current toolset, and build from there.
Sources
- Tool Test: Tool Storage Systems
- Engineerskill
- 5 Best Modular Toolbox Organizers for Professional Tool Storage (2026 Guide) - TripleD Tools
The testing-based sources above provide hands-on durability and usability data, while the buying guides focus on practical selection criteria rather than lab results.
FAQ
What is the best modular tool storage system?
There’s no single “best” system, it depends on whether you need portability, expandability or fixed-location speed. Stacking systems like Keter STACK N’ ROLL suit growing, mobile toolkits, while drawer chests suit static workshops.
What are some DIY tool storage ideas?
Stacked milk crates, rebuilt pallets turned into wall grids, and craft foam cut into custom inserts all deliver modular-style organisation at low cost. Second-hand modular cases are also worth checking, provided the latches and seals are still intact.
What is the cheapest way to store tools?
Repurposed containers like milk crates or plastic totes are the lowest-cost option, especially paired with cheap dividers or clear-lid organisers for small parts. They won’t match the weather resistance of a sealed case, so they suit garage or indoor storage better than outdoor or vehicle use.
What is the best budget-friendly tool storage option?
A quality plastic tote or tool bag with a few internal upgrades, foam inserts, small-parts trays, gives you most of the organisation benefit of a modular system without the higher cost of a full stacking ecosystem. For a slightly higher budget with more structure, a compact single module like the Keter Connect Tool Box offers a starting point that can expand later.


