
3–8 ACH: Shed Ventilation Options Homeowners Can Size, Fit and Install

For most storage sheds, balanced passive ventilation, a ridge vent paired with soffit or low wall intakes, solves heat and moisture problems on its own. Workshops, hobby spaces, and sheds in hot or humid regions usually need an active boost too: a whirlybird or solar fan. Get the sizing and the intake to exhaust balance right, and everything else falls into place.
TL;DR:
- Most sheds benefit from a ridge vent with soffit or low wall intake to create reliable passive airflow through the stack effect.
- For workshops or humid climates, adding a solar-powered fan or whirlybird ensures consistent ventilation when passive methods fall short.
- Calculate the proper vent sizing using the formula CFM = (shed volume × ACH) / 60, aiming for 3-4 ACH for storage and 6-8 ACH for workshops.
- Place vents ideally at the ridge and soffits, or use gable and wall vents with insect mesh to prevent pest entry and optimize airflow.
- Maintain vents regularly by cleaning screens, checking seals, and lubricating turbines to keep ventilation effective and pest-free.
Table of Contents
- What are the best shed ventilation options?
- How do I calculate the right amount of shed ventilation?
- Where should shed vents go, and does insulation matter?
- How do I install shed vents myself?
- How do I maintain and troubleshoot shed ventilation?
- Why Ketergroup understands shed ventilation
- Does better ventilation keep pests out of your shed?
- Are powered shed fans noisy?
- What does each ventilation type cost to run and maintain?
- What I’d prioritise if I were ventilating a shed today
- Which Keter shed suits your ventilation plan?
- Sources
- FAQ
What are the best shed ventilation options?
Every ventilation setup falls into one of two camps: passive, which relies on air naturally rising and escaping, or active, which uses a fan or turbine to force it along. Most sheds do best with a mix of both, but the right combination depends on what you’re storing and where you live.
Passive options cost nothing to run and have no moving parts to fail:
- Ridge vents run along the roof peak and let hot air escape at the highest point.
- Soffit vents sit under the eaves and pull cooler air in from outside, feeding the ridge vent above.
- Gable vents are fitted high on the end walls, useful as an alternative to ridge vents.
- Louvre or wall vents are simple and effective for creating cross flow when placed on opposite walls.
- Operable windows and doors add flexibility but shouldn’t be your only ventilation, since you won’t always remember to open them.
Active options step in when passive airflow can’t keep up:
- Whirlybirds (turbine vents) spin with the wind to pull air out continuously, using no electricity, though they need occasional lubrication and go quiet on still days.
- Solar-powered fans run off a small panel and work well on sheds without mains power nearby.
- Mains-powered exhaust or inline fans give the most consistent airflow but need a licensed electrician for wiring.
The most reliable retail advice pairs a ridge vent with soffit or low wall intake on most gabled sheds, and that combination is echoed across shed builder guides for a reason: it uses the stack effect, where warm air rises and draws cooler air in behind it, without moving parts. Whichever vents you choose, fit insect mesh behind every opening. A vent with no screen is just an open door for moths, spiders, and mice.
How do I calculate the right amount of shed ventilation?
The industry works off one formula: CFM = (volume × ACH) / 60, where CFM is cubic feet of air moved per minute, volume is your shed’s internal size, and ACH is air changes per hour. DIY Eco Homes recommends 3 to 4 ACH for a shed used purely for storage, and 6 to 8 ACH if you’re running a workshop with tools, chemicals, or heat-generating equipment.
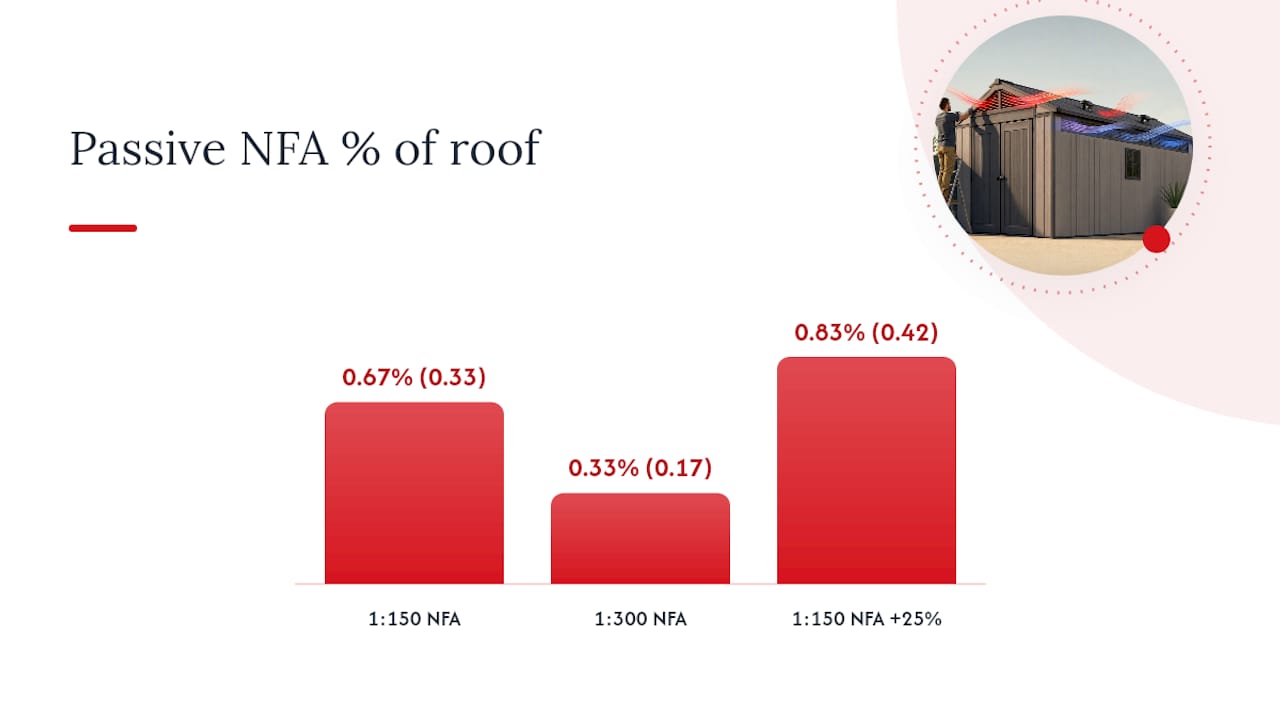
Passive vents are rated differently, using net free area (NFA), the actual open area air can pass through (smaller than the vent’s physical size because of louvres and mesh). The standard guideline is an NFA of roughly 1:150 to 1:300 of your roof area, split evenly between intake and exhaust. Skew that balance and you choke the airflow no matter how many vents you install.
Pro Tip: If you’re adding a powered fan, match its rated CFM to your total NFA, not just the target from the formula. A fan that outpaces your vent openings just throttles itself and wastes electricity pulling against a bottleneck.
Builders in exposed or high-humidity locations commonly oversize passive vent area by 20 to 30% as a buffer against still, sticky days when the stack effect alone won’t cut it.
Where should shed vents go, and does insulation matter?
Placement decides whether your ventilation actually works or just looks good on paper. The classic layout is ridge vent up top with soffit intake below it, giving you constant vertical flow. If your shed has no ridge to work with, a gable vent on one end wall paired with a low wall intake on the opposite side achieves a similar cross-flow effect. If you’re running power tools or storing solvents, put the intake vent near your workbench so fresh air reaches you first, not last.
Material choice changes your options too:
- Metal sheds need corrosion-resistant vents; standard steel louvres will rust and jam within a season near the coast.
- Closed-cell foam insulation blocks moisture but can trap condensation against the shed skin if ventilation is undersized.
- Breathable insulation lets vapour pass through gradually, which is more forgiving if your vent sizing is slightly off.
- Flashing and dampers keep rain out of roof-mounted vents without blocking airflow when closed partway.
A shed’s moisture barrier and insulation choices work hand in hand with ventilation, not instead of it. Skipping the vents because you’ve insulated well is the single most common mistake we see.
How do I install shed vents myself?
Before buying a single part, measure your shed’s internal volume and run it through the CFM and NFA calculations above. That number tells you how many vents you actually need, not how many look good on the wall.
Tools and materials: hole saw or jigsaw, tape measure, stud finder (for locating rafters), exterior sealant, flashing kit, insect mesh, corrosion-resistant screws, and basic electrical supplies if you’re fitting a powered fan.
- Mark and check. Locate rafters or wall studs, then check for wiring or obstructions behind the panel before cutting anything.
- Cut a test hole. Workshop forum regulars recommend a small pilot hole first to confirm there’s nothing hidden behind the cladding.
- Fit wall or louvre vents. Cut to size, seal the frame with exterior sealant, screw in place, and fit insect mesh on the inside face.
- Install a ridge vent run. This means removing a section of ridge capping, fitting the vent strip, and re-flashing over the top so rain can’t get in.
- Mount a whirlybird. Cut the roof opening to the manufacturer’s template, flash thoroughly, and secure with roofing screws rated for your material.
- Attach a solar fan. Position facing north for maximum sun exposure, seal the mounting flange, and run the low-voltage cable to the fan motor.
Call a licensed electrician for any mains-powered fan, and bring in a builder if the job involves altering roof trusses or structural framing. That’s not a job to improvise.
How do I maintain and troubleshoot shed ventilation?
A biannual check keeps most systems working: clean insect screens, inspect seals and flashing for cracks, lubricate turbine bearings on whirlybirds, and confirm powered fans still hit their rated CFM.
If problems show up between checks, the fix usually points to one cause:
- Condensation on the inside walls almost always means your intake area is undersized relative to exhaust.
- Persistent mould in corners signals dead air zones, often fixed by adding a second intake vent on the opposite wall.
- Weak airflow on hot days suggests your passive setup needs an active boost, a solar fan or whirlybird.
- Noisy turbines usually need a drop of lubricant on the bearing, not a replacement.
A cheap thermometer/hygrometer combo, sitting under $20 at most hardware stores, gives you an early warning before mould becomes visible.
Why Ketergroup understands shed ventilation
Getting airflow right starts with a shed built from materials that won’t warp, rust, or trap moisture in the first place. Resin sheds are designed to use weather resistant panels that hold their shape through Australian heat and humidity without the corrosion issues that plague cheap steel kits.
If you’re shortlisting a shed to fit around your ventilation plan, the layout matters as much as the material. A ready-made shed with the right storage zones makes it far easier to position intake and exhaust vents where they’ll actually do their job.
Does better ventilation keep pests out of your shed?
Good airflow does more than manage heat and moisture, it changes how liveable your shed is for insects and rodents. Damp, still air is exactly what silverfish, cockroaches, and mould mites look for, and a poorly ventilated shed becomes a breeding ground within a season.
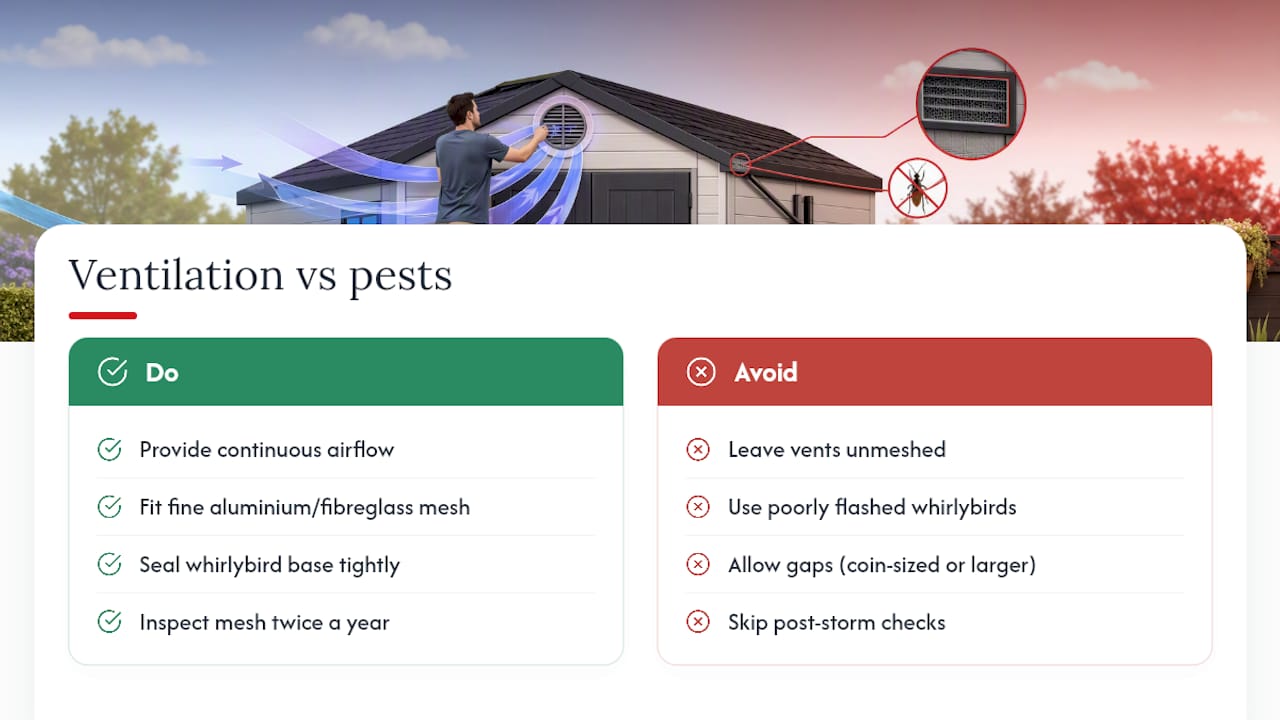
Here’s the catch: every vent you cut is also a potential entry point. A ridge vent or wall louvre without insect mesh behind it is an open invitation for wasps to build a nest inside your roof cavity, or for mice to squeeze through a gap barely bigger than a coin. That’s why mesh isn’t optional. Fit fine aluminium or fibreglass mesh behind every vent opening, and check it twice a year for tears, especially after storms.
Whirlybirds carry a specific risk here. Their constant rotation actually discourages birds and larger insects from nesting inside the turbine housing, but the roof penetration itself needs a tight seal, since a poorly flashed whirlybird base is a common entry point for possums looking for a dry spot to shelter in.
The upside is real: a well-ventilated, dry shed is simply less attractive to most pests than a damp, stagnant one. Moisture draws termites and encourages timber rot, which draws more pests still. Solving airflow solves half your pest problem before you’ve laid a single trap.
Are powered shed fans noisy?
Noise is the trade-off nobody mentions until they’re standing in the shed listening to it. Whirlybirds are close to silent in light wind, but pick up a low hum or occasional rattle in strong gusts, usually a sign the bearing needs lubricant rather than a fault with the unit itself.
Solar fans run quieter again, since most spin at lower speeds and sit flush against the roof rather than protruding into the airflow like a turbine housing does. Mains-powered inline or exhaust fans are the loudest option, and the noise scales with CFM: a fan pushing 130 CFM for a workshop will always run louder than a small 25 CFM unit in a storage shed.
If noise matters to you, a few practical choices help. Mounting fans away from adjoining walls (especially if the shed sits close to a bedroom window) reduces how much sound carries. Larger, slower-spinning fans tend to run quieter than small fans working hard to hit the same CFM target, so oversizing slightly and running a fan at a lower speed setting is often the quieter path to the same airflow. Rubber isolation mounts, sold cheaply at most hardware stores, also cut down on the vibration noise that travels through timber framing.
What does each ventilation type cost to run and maintain?
Passive ventilation wins on running cost every time, ridge vents, soffit intakes, gable vents, and wall louvres cost nothing to operate and need only an occasional clean. That makes them the default choice for most storage sheds where budget and simplicity matter more than precise climate control.
Whirlybirds sit in the middle. No electricity draw at all, since wind does the work, but they need a lubrication check once or twice a year to keep the bearing quiet and spinning freely. Over a decade, that’s a handful of five-minute jobs, not a real running cost.
Solar fans add a small upfront cost for the panel and motor but then run essentially free, drawing power only from sunlight. They’re worth considering for workshops that need consistent airflow through the middle of the day when solar output peaks anyway, matching supply to demand almost by design.
Mains-powered fans are the most capable option for heavy workshop use, moving serious volumes of air on demand, but they carry an ongoing electricity cost and need a licensed electrician for installation. For a shed used daily with power tools, that cost is usually worth it. For a shed storing garden gear and old furniture, it’s overkill you’ll rarely notice paying off.
What I’d prioritise if I were ventilating a shed today
If I had to boil this down to three things: durability, low maintenance, and balanced airflow beat every other consideration. A vent that corrodes in two seasons or a fan that needs constant fiddling isn’t solving your problem, it’s creating a new one.
Skip the guesswork. Measure your shed’s volume, decide whether you’re storing or working in it, and run the sizing formula before you buy a single vent. That fifteen minutes of maths saves you from the two most common failures: undersized intake starving your exhaust, or an oversized fan straining against vents too small to feed it.
— Liza
Which Keter shed suits your ventilation plan?
Once you’ve settled on a ventilation approach, the shed you choose needs a shape that works with it, not against it. The Keter Oakland Garden Shed 1175, at 3.5 x 2.3m, gives you a gabled roofline that suits a ridge and soffit combination well, ideal if you’re storing garden gear, bikes, or seasonal equipment that benefits from steady passive airflow.
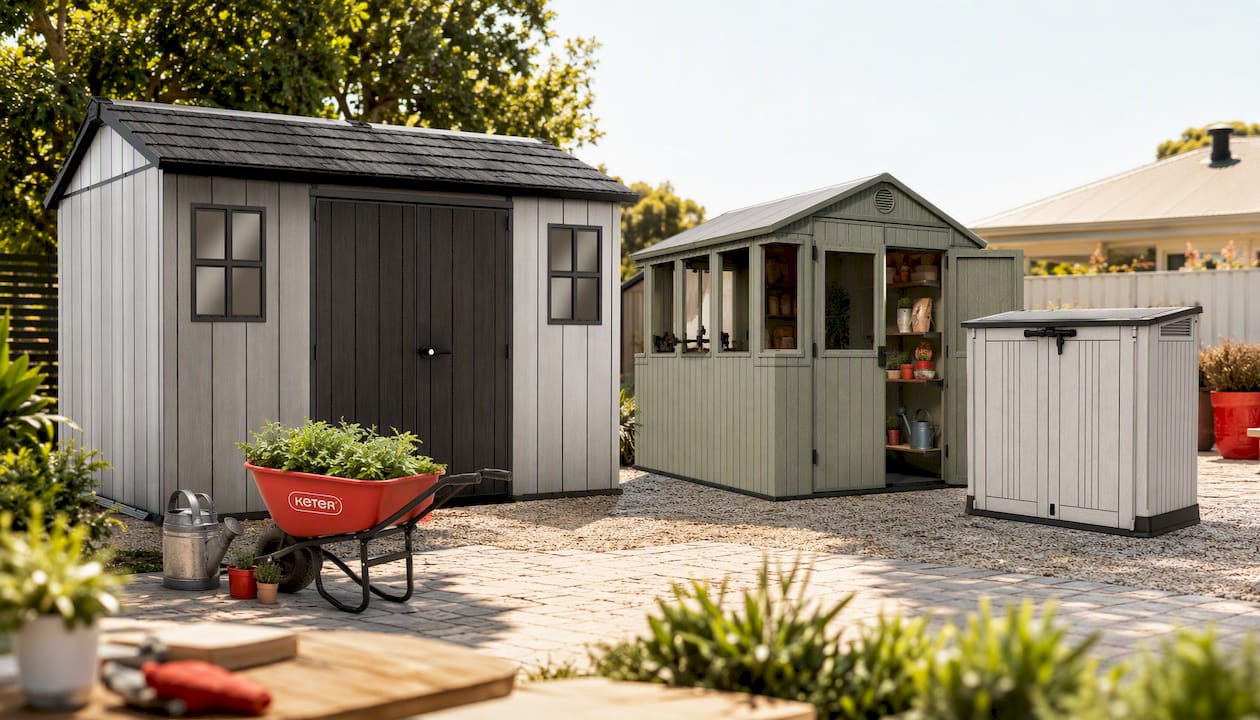
If you’re after a compact space for potting, seedlings, or hobby projects, the Keter Potting 6x8 Shed (1.9 x 2.4m) pairs naturally with a skylight vent or a simple gable and wall vent setup, letting light and air move through a smaller footprint. And if space is genuinely tight, the Store It Out Prime at 880L works as a low-footprint alternative where a full shed isn’t practical, still benefiting from basic passive airflow through its lid design.
These storage solutions are built from weather resistant resin that won’t rust or warp the way metal vent frames can, which matters when you’re planning vent placement into a structure meant to last. Setting up a hobby corner inside? A durable outdoor rug underfoot handles moisture better than bare flooring while you get your airflow sorted. Browse the current range on Ketergroup and check the assembly guide to see how vent placement fits into the build before you order.
Sources
For deeper detail on the maths and materials covered here, see DIY Eco Homes’ ventilation guide, AMC Sheds’ airflow overview, and the practical retrofit tips in the Bunnings Workshop community thread.
FAQ
What type of ventilation is best for a shed?
Balanced passive ventilation, a ridge vent paired with soffit or low wall intake, works best for most storage sheds. Workshops and humid climates usually need an active fan or whirlybird added on top.
How can I ventilate a shed effectively?
Split your ventilation area evenly between intake near the bottom and exhaust near the top, using the NFA guideline of roughly 1:150 to 1:300 of your roof area, then size any fan using the CFM = (volume × ACH) / 60 formula.
Should I put a whirlybird on my shed?
A whirlybird is a solid choice if you want continuous exhaust without running power, though it depends on wind, so pair it with soffit intake vents for reliable airflow even on still days.
How do I ventilate a shed with no windows?
Fit a combination of wall louvre vents on opposite sides for cross flow, or a roof vent paired with low wall intakes, since neither option needs a window to work.


