
Three Child Safe Outdoor Storage Formats Parents Should Use First

The safest outdoor storage setup uses three formats together: low, lidless or lightweight-lid boxes for everyday toys, lockable sheds or cabinets for chemicals and tools, and ventilated front or top-opening units for bulky gear like balls and ride-ons. The single check that matters most is lid design. A box with no gap protection around the lid, or one that seals hazardous items within a lockable zone, creates the real risk. Keter’s storage boxes and sheds cover both needs without demanding a renovation.
TL;DR:
- Choose lightweight, removable lids with ventilation to minimize entrapment risks and ensure safe access for children.
- Use lockable sheds or cabinets, placed away from play zones, to securely store hazardous items like chemicals and tools.
- Select resin or weather-resistant plastic storage units to prevent cracking, warping, and deterioration over time, especially in UV exposure.
- Match storage size and type to your yard space and family needs, with low boxes for toys and taller units for hazards, avoiding combining functions.
- Regularly inspect and maintain storage units seasonally to check for damage, debris blockage, or UV deterioration, ensuring ongoing safety and durability.
Table of Contents
- What counts as child safe outdoor storage?
- Which safety features should you check before buying?
- How do you separate the toy zone from the hazard zone?
- Inspection and maintenance checklist for outdoor storage
- Why Keter storage solutions are a practical, safety-oriented option
- What materials hold up best for outdoor storage units?
- How do you match storage to your yard size and family needs?
- What do child safe storage options cost, and how do they compare?
- Do you need professional installation for outdoor storage?
- What’s the total cost of ownership for outdoor storage?
- The safety detail most guides skip
- Ready to sort your backyard storage properly?
- Sources
- FAQ
What counts as child safe outdoor storage?
Outdoor storage for families splits into two very different jobs, and most backyards get the mix wrong. One job is keeping toys tidy and within a toddler’s reach. The other is keeping tools, chemicals and machinery well out of it. Treating both jobs with the same box is where trouble starts.
Here’s how the common formats stack up against that split, plus what to check before you buy or install any of them.
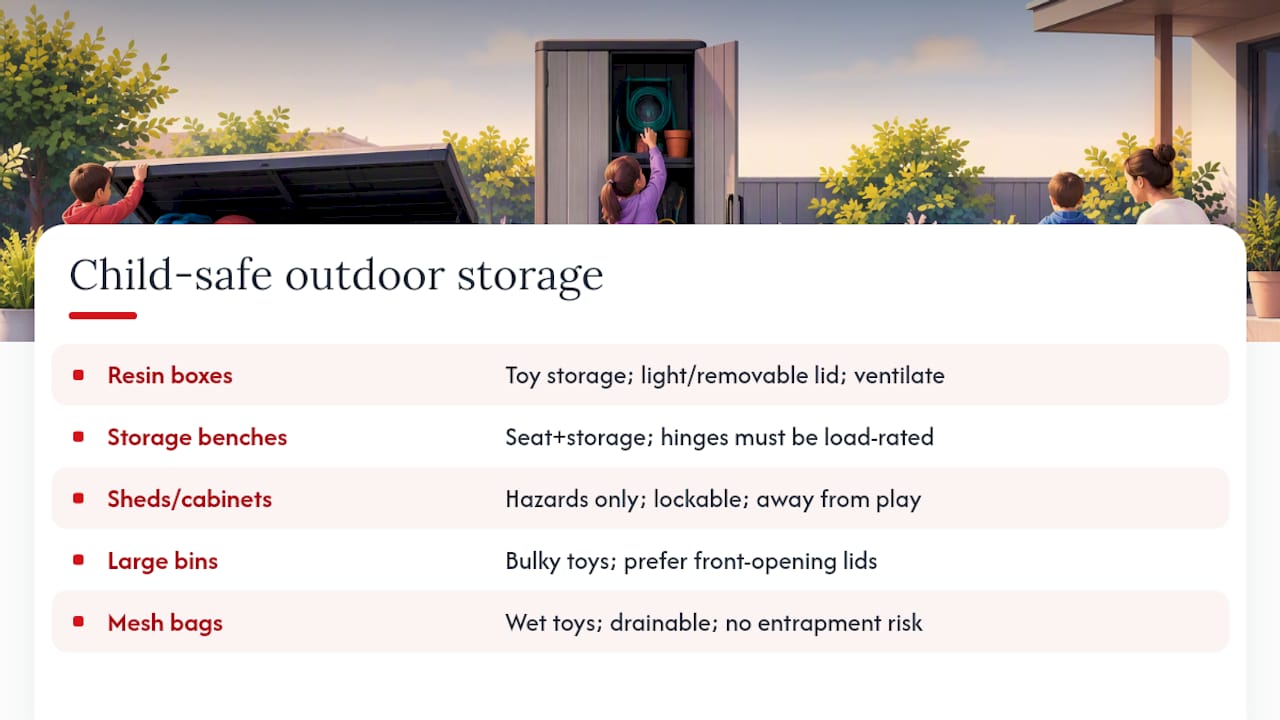
Resin deck boxes. These are the workhorse of outdoor toy storage ideas: low profile, weather resistant, and easy for a three-year-old to open and close without help. The trade-off is lid weight. A heavy resin lid that slams shut on unsupported hinges is exactly the entrapment risk the ACCC’s toy box guidance warns about. Look for a lid that’s either removable, genuinely lightweight, or fitted with an internal stopper that holds a gap rather than letting it drop shut. Ventilation holes matter here too, since a sealed box with a child inside is a suffocation risk regardless of how “safe” the exterior looks.
Storage benches. A bench that doubles as a toy box is popular because it earns its footprint twice over, giving you outdoor seating and storage in one unit. The same lid rules apply, but benches add a second concern: if the seat is load-bearing, check that hinges are rated for repeated opening and that the lid can’t be forced shut by a curious sibling while someone’s underneath rummaging for a ball.
Sheds and tall cabinets. This is where hazardous items belong, full stop. Lawnmowers, fertilisers, power tools, pool chemicals. A shed with a functioning lock, positioned away from play areas and pool edges, does the job a toy box never should. Raising Children Network recommends locking sheds and garages specifically because tools and poisons stored at ground level are within easy reach of a determined toddler.
Large lidded bins and front or top-opening units. Bulky items, ride-on toys, scooters, paddling pool floats, need more volume than a standard deck box offers. Front-opening designs are worth prioritising here because they let a child retrieve gear without lifting a heavy lid over their head at all, which sidesteps the entrapment question entirely.
Fence-mounted crates and cubbies. Handy for small balconies or courtyards where floor space is tight. The catch is mounting height and climbability. A crate fixed at a height a child could use as a step towards a fence or balcony rail defeats its own purpose, so mount low enough to be useful but not so low it becomes a ladder.
Mesh or ventilated bags for water toys. Wet pool noodles and inflatables need drainage, not a sealed tub where mould and mildew set in overnight. A hanging mesh bag solves the drainage problem and, because it’s never a hard-lidded container, removes any entrapment risk outright.
Rolling carts and ball racks. Great for garages and side paths, less great near stairs or slopes where an unsecured cart can tip. If you’re using wheeled storage, check for a locking caster or a simple wedge to stop it rolling when little hands lean on it.
Pro Tip: If you’re only buying one new piece this season, make it a front-opening box for the bulky stuff. It removes the lid-entrapment question altogether and it’s usually the item families underestimate needing most.
Which safety features should you check before buying?
Shopping for safe garden storage gets a lot simpler when you run through the same five checks every time, regardless of brand or price point.
- Lid design. Prefer lidless bins or genuinely light, removable lids for anything a toddler might climb into. If a lid is heavier or fixed, it needs an internal stopper holding a gap of at least 1.5 centimetres, per ACCC guidance. There’s currently no mandatory Australian toy-box standard, so this check falls to you as the buyer, not the label.
- Ventilation. Airtight cavities are the second half of the entrapment risk. A box with drainage or air holes reduces both mildew and suffocation risk if a child ever does get trapped inside.
- Locking and separation. Anything containing pool chemicals, fuel, tools or lawn equipment needs its own lockable unit, positioned away from the toy zone entirely. Don’t rely on a single latch shared across both toy and hazard storage.
- Placement and material durability. Weather resistant resin construction resists cracking and fading better than untreated timber in most climates, and it won’t develop the splinters or rust that ageing metal bins do. Check for UV-stable material if the unit sits in full sun most of the day.
- Distance from pools and fences. Never place a box or bench a child could climb on within one body length of a pool edge or a climbable fence. It sounds like a small detail, but it’s the difference between a tidy yard and an accidental climbing aid.
The ACCC notes that falling lids and trapped children are a recurring cause of serious injury in home settings, largely because buyers judge a toy box on capacity and price rather than on how the lid actually behaves under a child’s weight or curiosity. Capacity is the easiest thing to check on a product page. Lid geometry is the thing that actually protects a child, and it’s usually the detail nobody photographs.
How do you separate the toy zone from the hazard zone?
Good layout does most of the safety work before a single lock gets engaged. The idea is simple: give kids a zone they can access freely, and keep everything else genuinely out of reach.
- Toy zone: low containers, nothing higher than a toddler’s shoulder, clear labelling so older kids can help tidy up, and washable plastic toys rather than anything that holds water or grows mould.
- Hazard zone: a lockable shed or cabinet for chemicals, tools and machinery, positioned well away from both the play area and the pool edge. Healthy WA’s guidance recommends keeping pool chemicals cool, dry and lockable, and storing liquids in a plastic crate so a leak doesn’t mix incompatible products.
- Pool toys: store them away from the pool edge after each play session rather than leaving them poolside. The ACCC is explicit that pool toys are not lifesaving devices, so storage habits should never substitute for active supervision.
How this plays out depends on your space. On an apartment balcony, a single compact box like a Keter City Box can hold everyday toys, while chemicals simply have no place there at all. In a small backyard, a deck box for toys and a small lockable cabinet for tools usually covers it. In a larger yard with a shed, keep the shed locked and dedicated to hazards only, and let a separate low box near the play area carry the daily toy traffic.
Inspection and maintenance checklist for outdoor storage
A safe box on day one doesn’t stay safe without a bit of upkeep. Run through this after assembly, then again each season.
- After assembly: tighten all hardware, test that hinges move freely, confirm lid stoppers actually hold the gap they’re designed to hold, and check that ventilation holes aren’t blocked by packaging or placement against a wall.
- Each season: inspect for cracks, brittle plastic, sharp edges where material has degraded, and drainage holes clogged with leaves or dirt that let water pool inside.
- After storms or heavy sun exposure: check for UV damage. Materials that have gone brittle or feel unstable underfoot need replacing, not patching.
- Straight away: pull any broken toy out of the child-access zone the moment you spot it, and secure or dispose of any hazardous item that’s ended up somewhere it shouldn’t be.
Pro Tip: Do the seasonal check on the same weekend you change your smoke alarm batteries. Two five-minute jobs, one habit, and you’ll never let it slip.
Why Keter storage solutions are a practical, safety-oriented option
Keter builds its outdoor storage from weather resistant recycled resin, which means no rust, no rot, and no splinters as units age, exactly the durability profile the checklist above asks for. Assembly is designed to be DIY-friendly, so getting a unit safety-ready doesn’t require a tradesperson.
Across the catalogue, front and top-opening boxes suit bulky toy storage, while lockable sheds handle the hazard zone. For a balcony, a compact city box does the job. For a small yard, pair a deck box with a shed. For a poolside setup or a combined hazard-and-toy yard, run both formats side by side rather than asking one box to do two jobs.
[brand_signal] [author_bio]
What materials hold up best for outdoor storage units?
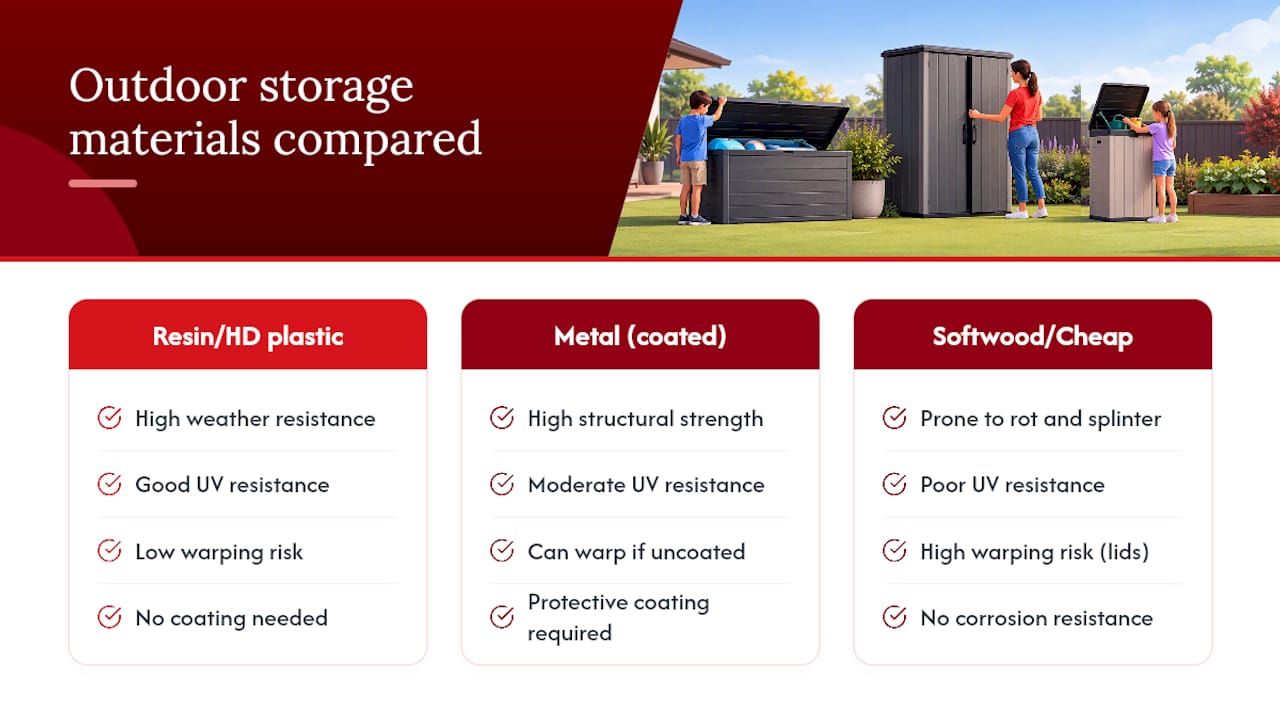
Material choice decides whether a storage unit is still safe in three years or just an eyesore with a cracked lid. Resin and heavy-duty plastic dominate the outdoor storage category for good reason: they don’t rust like untreated metal, don’t rot or splinter like softwood, and cope with UV exposure far better than cheaper plastics that turn brittle within a season or two.
Weather resistant resin construction handles rain, sun and temperature swings without warping, which matters for lid alignment specifically. A warped lid stops sealing properly, which can mean gaps that weren’t there when you bought it, or worse, a lid that no longer closes at all and becomes a trip hazard. Metal storage still has a place for heavy-duty tool sheds, but it needs a protective coating to resist corrosion near pools or coastal air.
Durability isn’t just about the base material either. Hinge quality, wall thickness and UV stabiliser content in the resin all affect how long a unit stays structurally sound. A thin-walled budget box might look identical to a sturdier one in a product photo, but it’s the one likely to crack at a stress point within a year of daily use by kids climbing in and out.
How do you match storage to your yard size and family needs?
Start with what you’re actually storing, not the available floor space. A family with two toddlers and a backyard full of ride-on toys needs volume and easy front access far more than a family with older kids who mostly need bikes and sports gear tucked away.
Yard size sets the ceiling on what’s practical. A courtyard or balcony calls for a single compact box doing double duty as seating and storage. A mid-sized backyard usually needs at least two units: one low box for daily toy access, one taller locked unit for anything hazardous. A larger block with a pool or a shed adds a third layer, dedicated poolside storage kept away from the water’s edge.
Family stage matters as much as square metreage. Households with children under five should weight every decision towards lidless or light-lid boxes and skip anything with a heavy hinged top near play areas altogether. Once kids are older and toy volume shifts towards bikes, sports equipment and bulkier gear, front-opening sheds and larger bins become the better fit, since entrapment risk drops but storage volume needs climb.
What do child safe storage options cost, and how do they compare?
Prices vary across the outdoor storage category, so it pays to compare by feature rather than by sticker price alone. Compact boxes suited to balconies or small courtyards sit at the lower end of the range and prioritise portability over volume. Mid-sized deck boxes, the workhorses for everyday toy storage, cost more but add capacity and better lid engineering.
Sheds represent the biggest jump in outlay, reflecting their size and the locking hardware needed to keep hazardous items secure. That extra cost buys peace of mind you can’t get from a toy box, since sheds are the only format built to properly separate tools, chemicals and machinery from a child’s daily play area.
The trade-offs run roughly like this: compact boxes are affordable and easy to move but limited in volume; deck boxes balance price and practicality well for most backyards; benches add seating value but cost more per litre of storage than a plain box; sheds cost the most upfront but solve a safety problem nothing else does. Current pricing for any of these sits on the Keter Australia site rather than in this guide, since ranges shift with stock and season.
Do you need professional installation for outdoor storage?
Most resin storage boxes and benches are designed for straightforward DIY assembly, typically needing nothing more than a screwdriver and twenty to forty minutes. Sheds take longer and benefit from a flat, level base prepared in advance, ideally a paved or compacted gravel pad rather than bare soil, which helps prevent the unit shifting or pooling water underneath over time.
Larger sheds sometimes call in a second pair of hands for lifting wall panels into place, but professional installation isn’t a requirement for most Keter units. Where it does help is with anchoring: securing a shed to its base with the anchor kit prevents wind uplift and adds real stability, particularly important if the unit stores heavier hazardous items and needs to stay put through weather. If you’re not confident levelling a base yourself, a local handyperson can usually complete that groundwork in an afternoon.
What’s the total cost of ownership for outdoor storage?
Purchase price is only the first line in the ledger. Base preparation for a shed, whether that’s a pavers or a levelled gravel pad, adds a modest cost most people handle themselves over a weekend. An anchor kit is a smart add for exposed or windy sites, and if you’re layering a lock upgrade or an internal cabinet for chemicals, factor that in too.
Ongoing costs stay low with resin and weather resistant plastic units, since there’s no repainting or rust treatment required the way there is with timber or untreated metal. The main recurring cost is time, not money: the seasonal inspection checklist covered earlier takes minutes but is what keeps a unit safe and functional well past its first year. Replacement becomes the real cost driver if a unit is left to degrade under constant sun exposure without any UV protection, so buying weather resistant materials upfront is usually cheaper over the unit’s life than buying budget and replacing it twice.
The safety detail most guides skip
Most advice on outdoor toy storage stops at “get a lid with a lock” and calls it done. That’s backwards. A locked lid on a toy box does nothing to reduce entrapment risk, and in some cases makes it worse, because a determined toddler can still open a lid partway and get stuck underneath it. The feature that actually protects kids is the stopper mechanism and the ventilation, not the lock.
The conventional wisdom also treats hazard storage as an afterthought, something you’ll “sort out eventually.” I’d flip that priority. Get the lockable shed or cabinet sorted first, because that’s the item protecting your child from chemicals and machinery, the genuinely dangerous stuff. The toy box is about tidiness and minor injury prevention; the hazard zone is about serious harm prevention. Budget and attention should follow that order, not the reverse.
If you take one thing from this guide, let it be this: check lid geometry with your own hands before you buy, and separate your zones before you organise within them. Everything else is refinement.
— Liza
Ready to sort your backyard storage properly?
Outdoor storage solutions can address both toy clutter and hazard risks without the need to search through multiple brands or guess at which products meet safety checks. Resin boxes and sheds available on the market are often designed to be weather resistant, easy to assemble, and come in various sizes suitable for balconies or backyards.
For everyday toys, a compact option like the Keter City Box suits balconies and small courtyards, while a larger front-opening box handles bulkier ride-ons and sports gear. For the hazard zone, browse the outdoor storage sheds built for lockable, secure separation of tools and chemicals. If you’d rather see the full range in one place, start at the Keter Australia storage and garden collection and work out what your yard actually needs before you buy.
Sources
- Toy boxes guide | Product Safety Australia (ACCC)
- Aquatic toys mandatory standard | Product Safety Australia (ACCC)
- Child safety at home outdoors: in pictures | Raising Children Network
- Safe use and storage of chemicals for your pool | Healthy WA
FAQ
What is the best storage system for a child’s room or backyard?
The best system for outdoor use pairs a low, lidless or light-lid box for everyday toys with a separate lockable shed or cabinet for anything hazardous. Indoors, the same lid-safety principles apply, but the priority outdoors is keeping toy storage and hazard storage physically apart.
Is there a weather resistant outdoor cupboard available?
Yes. Resin cabinets and sheds designed for outdoor use resist rain, UV exposure and temperature swings without rusting or rotting the way timber and untreated metal can. Look for a unit that’s specifically built weather resistant rather than simply painted for outdoor use, since the two perform very differently over a few Australian summers.
Where can I store kids’ toys outside safely?
Low, front-opening boxes near the play area work best, provided the lid is either removable, lightweight, or fitted with an internal stopper holding a gap of at least 1.5 centimetres, per ACCC guidance. Keep this storage well clear of the pool edge and any climbable fence line.
How do I store outdoor gear without a full shed?
A large deck box or a storage bench covers most everyday needs without the footprint or cost of a shed. For hazardous items like chemicals or tools, a smaller lockable cabinet can substitute for a full shed, as long as it’s genuinely lockable and kept out of the child-access zone entirely.
How much does child safe outdoor storage cost?
Costs vary by size and format, from compact balcony boxes at the lower end through to full lockable sheds at the higher end. Current pricing across the range sits on the Keter Australia site, since figures shift with stock and season rather than staying fixed.


